

En pocas palabras

a collaboration by Greg Flores
In this tutorial, we are going to take a deep tour of how to use the three core technologies that are currently most demanded by the global market of information technologies: Python, IA, and Cloud Computing. Right now, these technologies have exponential growth in both, labor demand and wages, so if you want to be competitive in the field you must know them.
I divided this tutorial into 5 essential parts:
- How to set up the OSX environment
- How to create a Docker compose file for the TensorFlow binaries
- How to create a Docker compose file with all the necessary packs to run the Jupyter notepad with TensorFlow
- Steps to upload your docker image to docker hub
- Run TensorFlow tutorial
The computer used to create this tutorial
- MacBook pro intel core i7
- OSX 10.14.6, Mojave
Note: I wrote the commands to run on CENTOS or any other Linux flavors based on REDHAT.
#1 Set Up The Environment
A little bit of history…
We are going to use the most popular package manager on the internet. It is called “brew”. The name is intended to suggest the idea of building software on the Mac depending on the user’s “taste”. There are some other options, but they have been losing their own brightness.
One of the oldest package managers is called “MacPorts” or just “ports” and it is widely used across the world
The MacPorts, formerly called DarwinPorts was released in 2002 as part of the open-source initiative. Now the homebrew is the most important and extremely distributed across the world. Homebrew could be considered as a standard for the developer’s community
If you want to install the package manager known as “brew” you have to visit the official page and follow the instructions or simply use the following command line.
Follow the URL brew.sh
$ /usr/bin/ruby -e "$(curl -fsSL https://raw.githubusercontent.com/Homebrew/install/master/install)"Before we start working with the package manager “brew”. You should install the optional Command Line Tools. After that, we could start installing all the necessary packages to work for this tutorial
It is highly important that you follow the next instructions step by step to install the programs and libraries. Otherwise, you may face uncommon problems that are not covered in this tutorial.
OSX
xcode-select --install
brew update
brew install docker-compose
brew cask install docker
brew cask install virtualbox
brew cask install minikube
brew install kubectl
brew install nano
brew install curl
brew doctor
brew cleanup
CentOS
su
yum update
yum upgrade -y
yum  groups install "Development Tools"
yum install nano
yum install curl
yum install docker
After that just create a directory to start working on it. Example
mkdir $HOME/coders/tf_tutorial
cd $HOME/coders/tf_tutorial
Note: There is no difference between OSX or Linux except for one thing. OSX start the app and wait.
Linux
service docker startI decided to add this part of the process for purely technical motivation and transfer of knowledge. Because all the binaries build are downloaded directly from my GitHub account server.
Feel free to build it by yourself but. You have to be very careful, the process takes between 6 and 18 hours depending on your machine.
Follow the next steps on your terminal
#2 Create a Dockerfile
FROM alpine:3.7
MAINTAINER Binghong Liang <liangbinghong@gmail.com>

ENV JAVA_HOME /usr/lib/jvm/java-1.8-openjdk
ENV BAZEL_VERSION 0.10.0
ENV TENSORFLOW_VERSION 1.7.0

RUN true \
    && apk upgrade --update \
    && apk add bash python2 py2-pip python3 freetype libpng libjpeg-turbo libstdc++ openblas libexecinfo \
    && apk add --no-cache --virtual=build-dependencies wget curl ca-certificates unzip sed \
    python3-dev freetype-dev libpng-dev libjpeg-turbo-dev musl-dev openblas-dev  libexecinfo-dev \
    gcc g++ make cmake swig linux-headers openjdk8 patch perl rsync zip tar gzip \
    && rm -rf /usr/bin/python \
    && ln -s /usr/bin/python3 /usr/bin/python \
    && python3 -m pip install -U --no-cache-dir pip setuptools wheel numpy \
    && cd /tmp \
    && curl -SLO https://github.com/bazelbuild/bazel/releases/download/${BAZEL_VERSION}/bazel-${BAZEL_VERSION}-dist.zip \
    && mkdir bazel-${BAZEL_VERSION} \
    && unzip -qd bazel-${BAZEL_VERSION} bazel-${BAZEL_VERSION}-dist.zip \
    && cd bazel-${BAZEL_VERSION} \
    && sed -i -e '/"-std=c++0x"/{h;s//"-fpermissive"/;x;G}' tools/cpp/cc_configure.bzl \
    && sed -i -e '/#endif  \/\/ COMPILER_MSVC/{h;s//#else/;G;s//#include <sys\/stat.h>/;G;}' third_party/ijar/common.h \
    && bash compile.sh \
    && cp -p output/bazel /usr/bin/ \
    && cd /tmp \
    && curl -SL https://github.com/tensorflow/tensorflow/archive/v${TENSORFLOW_VERSION}.tar.gz \
    | tar xzf - \
    && cd tensorflow-${TENSORFLOW_VERSION} \
    && sed -i -e '/JEMALLOC_HAVE_SECURE_GETENV/d' third_party/jemalloc.BUILD \
    && sed -i -e '/#define TF_GENERATE_BACKTRACE/d' tensorflow/core/platform/default/stacktrace.h \
    && sed -i -e '/#define TF_GENERATE_STACKTRACE/d' tensorflow/core/platform/stacktrace_handler.cc \
    && PYTHON_BIN_PATH=/usr/bin/python \
    PYTHON_LIB_PATH=/usr/lib/python3.6/site-packages \
    CC_OPT_FLAGS="-march=native" \
    TF_NEED_JEMALLOC=1 \
    TF_NEED_GCP=0 \
    TF_NEED_HDFS=0 \
    TF_ENABLE_XLA=0 \
    TF_NEED_VERBS=0 \
    TF_NEED_OPENCL=0 \
    TF_NEED_CUDA=0 \
    TF_NEED_MPI=0 \
    TF_NEED_S3=0 \
    TF_NEED_GDR=0 \
    bash configure \
    && bazel build --config opt --local_resources 4096,.5,1.0 //tensorflow/tools/pip_package:build_pip_package \
    && ./bazel-bin/tensorflow/tools/pip_package/build_pip_package /tmp/tensorflow_pkg \
    && cd \
    && pip3 install --no-cache-dir /tmp/tensorflow_pkg/tensorflow-${TENSORFLOW_VERSION}-cp36-cp36m-linux_x86_64.whl \
    && pip3 install --no-cache-dir pandas scipy scikit-learn keras tensorlayer pillow requests cython \
    && pip2 install --no-cache-dir supervisor \
    && apk del build-dependencies \
    && rm -f /usr/bin/bazel \
    && rm -rf /tmp/* /root/.cache
Or just download from here using curl:
curl -O https://raw.githubusercontent.com/bygregonline/coders-tensorflow_docker_howto/master/tensorflow/Dockerfile

docker build . -t bygreg/codertensorflow:v1
! Important
Please remember the first part of the name should be your docker hub username. otherwise, when you try to upload your image into the Dockerhub servers you will get some really weird and not easy to understand messages
For this particular example is “bygreg”
When you upload the image it will be available at
https://cloud.docker.com/u/”youruser”/repository/docker/”youruser”/”your_image”
#3 Put all the things together
Create a docker image using docker-compose from the well know Linux Alpine.
Here is the Dockerfile:
FROM alpine:3.7
RUN mkdir -p /usr/src/codersinc
WORKDIR  /usr/src/codersinc
RUN apk upgrade --update
RUN apk add gcc g++ make cmake swig linux-headers  patch perl rsync zip tar gzip curl figlet
RUN apk add python3-dev freetype-dev libpng-dev libjpeg-turbo-dev musl-dev openblas-dev  libexecinfo-dev bash
RUN python3 -m pip install -U --no-cache-dir pip setuptools wheel numpy
RUN pip install pandas
RUN pip install Cython
RUN pip install scikit-learn
RUN pip install  matplotlib

RUN curl -O https://raw.githubusercontent.com/bygregonline/coders-tensorflow_docker_howto/master/app/requirements.txt
RUN pip install  -r requirements.txt
RUN pip install https://github.com/bygregonline/tensorflow1.7.0_builds/raw/master/tensorflow-1.7.0-cp36-cp36m-linux_x86_64.whl
RUN pip list
RUN figlet ALL DONE
RUN echo $'python3 simple.py \njupyter notebook --allow-root --ip="*" --NotebookApp.token="" --NotebookApp.password=""' >run.sh
RUN echo $'from aniachi.systemUtils import Welcome as W\nW.print_welcome()'>simple.py
#DOWNLOAD DATA
RUN curl https://raw.githubusercontent.com/bygregonline/linear_regression/master/CME-Logo.png --output CME-Logo.png
RUN curl https://raw.githubusercontent.com/bygregonline/linear_regression/master/aniachi_logo.png --output aniachi_logo.png
RUN curl https://raw.githubusercontent.com/bygregonline/linear_regression/master/markblogtensorflow.png --output markblogtensorflow.png
RUN curl https://raw.githubusercontent.com/bygregonline/linear_regression/master/python3d.png --output python3d.png
RUN curl -O https://raw.githubusercontent.com/bygregonline/coders-tensorflow_docker_howto/master/app/LinearRegresionToGitHub.ipynb
RUN chmod 777 run.sh
EXPOSE 8888
ENTRYPOINT ["bash","/usr/src/codersinc/run.sh"]
Or just download it from here using curl:
curl -O https://raw.githubusercontent.com/bygregonline/coders-tensorflow_docker_howto/master/app/Dockerfile
I will try to be more specific explaining what each line of the script does:
FROM alpine: 3.7
It means that we are going to use a very popular small Linux image.
Linux alpine version 3.7
That image is heavily used in the containerized applications into the cloud.
RUN mkdir -p / usr / src / codersinc
This command creates a folder inside the Linux container that we just created.
WORKDIR / usr / src / codersinc
Know the operating system knows in which folder we are going to work. From here everything runs on the container
RUN apk upgrade –update
We update the OS repositories and upgrade the operating system with their own package manager
RUN apk add gcc g ++ make cmake swig linux-headers patch perl rsync zip tar gzip curl figlet
RUN apk add python3-dev freetype-dev libpng-dev libjpeg-turbo-dev musl-dev openblas-dev libexecinfo-dev bash
The os installs all the libraries with their package manager. The same package manager is also responsible for installing all the dependencies.
RUN python3 -m pip install -U –no-cache-dir pip setuptools wheel numpy
Install and update pip wheel at the same time install the well know numpy library
RUN pip install pandas
RUN pip install Cython
RUN pip install scikit-learn
RUN pip install matplotlib
RUN curl -O https://raw.githubusercontent.com/bygregonline/coders-tensorflowdockerhowto/master/app/requirements.txt
Download requirements.txt file and save into local directory
RUN pip install -r requirements.txt
Install the necessary python modules
and finally, we call the requirements.txt file with the rest of the python modules.
It must be done in this order otherwise the docker-compose does not work correctly.
RUN pip install https://github.com/bygregonline/tensorflow1.7.0builds/raw/master/tensorflow-1.7.0-cp36-cp36m-linuxx86_64.whl
This is the binary we just created in the previous section, but as the compiler takes a very long time to build it. I have decided to upload the binary into the GitHub server to make it easier for all of us to install an run the tutorial
RUN pip list
print a list of all modules
RUN figlet ALL DONE
print a friendly message “ALL DONE” when everything has been done
RUN echo $’python3 simple.py \njupyter notebook –allow-root –ip=”*” –NotebookApp.token=”” –NotebookApp.password=””‘ >run.sh
build the entry point script
RUN echo $’from aniachi.systemUtils import Welcome as W\nW.print_welcome()’>simple.py
build the welcome script
RUN curl https://raw.githubusercontent.com/bygregonline/linear_regression/master/CME-Logo.png –output CME-Logo.png
RUN curl https://raw.githubusercontent.com/bygregonline/linearregression/master/aniachilogo.png –output aniachi_logo.png
RUN curl https://raw.githubusercontent.com/bygregonline/linear_regression/master/markblogtensorflow.png –output markblogtensorflow.png
RUN curl https://raw.githubusercontent.com/bygregonline/linear_regression/master/python3d.png –output python3d.png
RUN curl -O https://raw.githubusercontent.com/bygregonline/coders-tensorflowdockerhowto/master/app/LinearRegresionToGitHub.ipynb
Download all assets and the TensorFlow tutorial notebook
RUN chmod 777 run.sh
run.sh file is now readable, writable and executable by everyone
EXPOSE 8888
expose the port 8888 to the world
ENTRYPOINT [“bash”, “/ usr / src / codersinc / run.sh”]
provides instructions to tun when the container starts
In order to run the docker image please follow the next instructions.
docker build . -t bygreg/tensorflowtutorial:v4
#4 Upload your docker image to docker hub
- Please go to docker hub
- Create an account
- login to docker hub using your command line
docker login -u <username> -p <password>

docker push  "your-username"/"your_image":"yourtag"
we are almost done
In order to run the docker image please follow the next instructions.
docker run -p 8888:8888 "your-username"/"your_image":"yourtag"

#5 Run TensorFlow tutorial
If you only want to run the image with the TensorFlow tutorial. We have great news. All the work and the 20 hours of computer time processing has been done and is ready for you. You just need to run the following command:
docker run -p 8888:8888 bygreg/tensorflowtutorial:v4
After that, you should be able to access the port 8888 from your host computer.
Example
http://localhost:8888
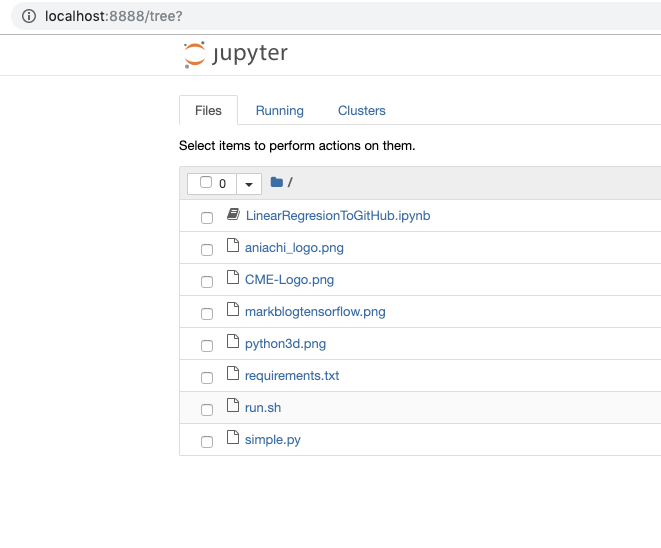
Select LinearRegresionToGitHub.ipynb
And start learning from an amazing self-contained TensorFlow tutorial.
The installed notebook allows us to go hand in hand and step by step from the simplest math to the most complex calculations of machine learning. Please take some time to see what each cell of the notebook does, if something goes wrong. I will not be able to provide help. The notebook is available at gregs github repo
Puntos clave
Newsletter
Artículos directo en tu inbox
Consejos, guías y recursos para tu carrera tech — sin spam, solo lo que vale la pena leer.
¡Listo! Tu registro fue exitoso.
Te enviaremos los mejores artículos a tu inbox.

